
Building the perfect CMDB with System Centre Part 4
New Connections for bespoke tools

Introduction to the next part
On the previous part we spoke of how to focus on the data integrity of all of the foundational components of all of the default connections which would plug directly into Service Manager such as;
- Active Directory
- System Centre Configuration Manager
- System Centre Operations Manager
But now in this part we look at the same type of strategy, however we now focus on tools or bespoke tools which do not contain a connector at all and therefore have not only build the connection from scratch but also have to develop the strategy for ensuring correct data is being pulled from it.
This will contain several sections to see an end to end solution for this which will incorporate the use of System Centre Orchestrator.
How does System Centre Orchestrator play a part in this
Orchestrator is mainly the tool which is now recognized to be the foundation of any new connectors for not just Service Manager but for any System Centre tool and with some respect to any tool.
Integration packs exist for each technology within the System Centre suite and therefore allows us to build an end to end workflow that would carry data from a bespoke tool all the way to the Service Manager CMDB.
Building the connectors - Scenarios to consider
So we will use two scenarios here which will essentially cover everything and will explain the reasonings behind picking those scenarios so you can understand what is required. First we will start with the foundation of each of the design requirements for the connectors themselves within each scenario.
Scenario 1 - Building a connector from scratch
The first scenario is where we have to build everything from scratch where there are no foundations for anything there at all in terms of a bridge which may already exist or any familiarity of how it would collect and store data.
Below are some design sections to consider in this scenario.
Data Points the tool uses
Most tools would tend to use a SQL database to keep all of its data recorded, then again it would be wrong to assume this for every single tool as some may perhaps use an internal database or another based off a different SQL platform such MySQL, NoSQL or even within SDKs such as PowerShell/VB/WMI and even a CSV in some cases.
Attributes of Interest
When it comes to forming the actual connector itself, we also need to think of the aspect of creating the attributes which we are looking to extract from the database so when we do go to populating the CMDB we have the correct information at hand to do the correct CI mapping.
In order for us to do this we need a) the connector but we also need b) a management pack which will contain all of those properties in which all of those attributes of interest would be mapped to.
Say for example we develop a connector for something like Sophos. What would be valid information we would want? For example it would be things like;
- Name (Name of the managed device)
- Agent Managed (Normally defined by a Boolean data type with 1 being true and 0 being false)
- Version (Version of the agent)
- Sophos Management Server (Name of the Primary Sophos Server)
- Last Scan (Last scan performed)
Correct permissions to access the data
Within the default connectors you are normally prompted to provide a service account which would be used to have enough permissions to not only the tools itself but also the database (if applicable) as well to be able to have enough rights to extract the information.
It is best to have this planned out and implemented before continuing to build the actual connector itself.
Data synchronization scheduling
This can be set however often as you want, however it would be great to understand more of the baseline of the tools which you are using to extract information from to get a better idea of when to actually schedule a synchronization to ensure that you are capturing new or modified data in the most correct way.
For example where Sophos is concerned one of the main functions is how often scans run on each machines as well as if they detect anything which is considered a threat would have an influence on when your schedules should perhaps run. At the same time you may have managed machines in groups where each could be segregated by departments and have different settings for each etc
These are all elements to consider.
Scenario 2 - Enriching a connector which already existsScenario 2 - Enriching a connector which already exists
This is an interesting scenario, and the reason why I've picked this is because there is indeed something I had picked up whilst using the default connectors.
Lets focus on the System Centre Operations Manager CI connector for example. I had touched on this on the previous part. When it comes to the synchronization of data you will notice with everything it gathers what it doesn't actually collect is the health states as well as information of its agent managed status or which management server it would be reporting to.
To me this is quite key information for a CMDB and should be populated.
Data Points the tool uses
We know System Centre Operations Manager utilises two databases being the main operational database and also the Data Warehouse. So we already have a source for which we can obtain information from. On the other hand we also have a PowerShell module in which we could utilise as well, technically this connector is being built from scratch but only really to enhance or cover what the default one is not doing.
Attributes of Interest
In this case we want to capture the attributes which we are missing so it would be properties like;
- Name (Name of Managed Device)
- Is Available
- Health State
- Availability Last Modified
Correct permissions to access the data
Ideally utilising the same service account which was used for the original CI connector which may already be in use in Service Manager would be the best route to take in this instance.
Data synchronization scheduling
This should ideally mimic the same schedule as your SCOM CI connector as you will also want to keep up with the health state changes as well as the management information of each agent.
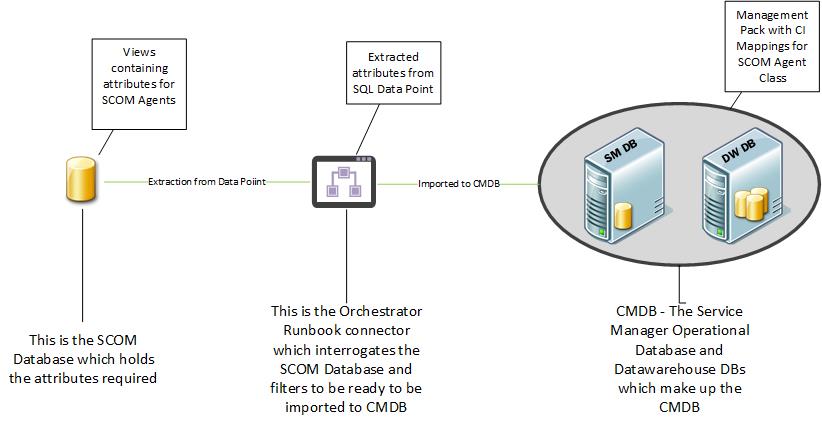
Overview - High Level look of the connector solution
Below is a visio digram which provides an idea of how the custom connector solution end to end would work
Building the connectors
Now we will go into the step by step mechanics of creating the overall connector solution from end to end. We will go with Scenario 2 as it covers in fact both scenarios for the fact that the whole thing has to be created from scratch but at the same time there is already a familiarity of what to actually build from.
Creating the management pack
So the first piece we will create the actual Management Pack itself.
The management pack will contain all of the attributes in which we require and you will see how this will all be linked together once its eventually imported.
Firstly you will need to make sure you have the Service Manager Authoring console installed, which should be bundled with your Service Manager installation media depending on what version you are running.
- Open the Service Manager Authoring Tool
- Click File - New
- Type in a name and location for the Management Pack. In this case we will call it something like SystemCenter.SCOMAgent.ManagementPack so we have a clear understanding of what the MP is for
- Once done right click the Classes selection in the explorer on the right and select " Create Configuration Item Class "
- Type in a meaningful name with no spaces, something like SCOMAgents then click OK.
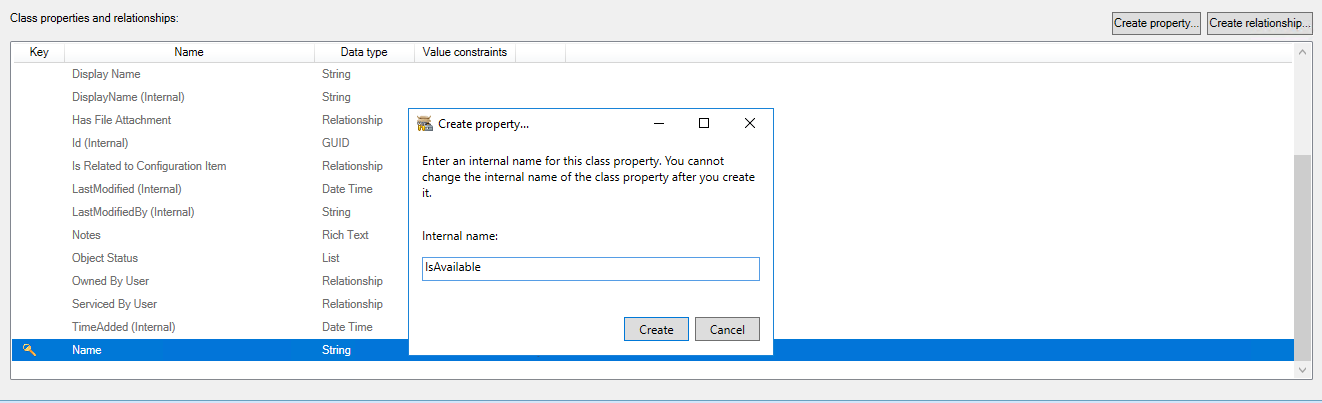
- Once done you would then go to the Create Property radio button so that we can start to add the attributes we need. So if we take notes of the properties above in Scenario 2, these are what we would need. So type in the Property Name where appropriate and click OK.
- Configure the details where necessary, however it is best sometimes to leave its data type as string to avoid any issues. (Note: Preferably a property such as Name would be a key value)
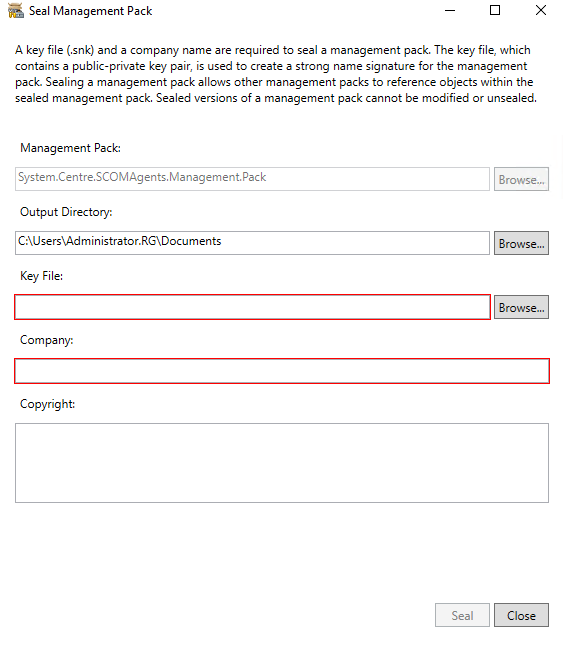
- Before you are ready and completed you want to seal the Management Pack so if you have visual studios installed and have the devtools available. You would bring up the Developer command prompt for cmd or Powershell window and run sn.exe -k <Location of the key>.snk . Then right click the Management Pack and select Seal Management Pack and select the key you have just created.

Now that's done you will now want to import the management pack so now we perform the following;
- Open the Service Manager Console
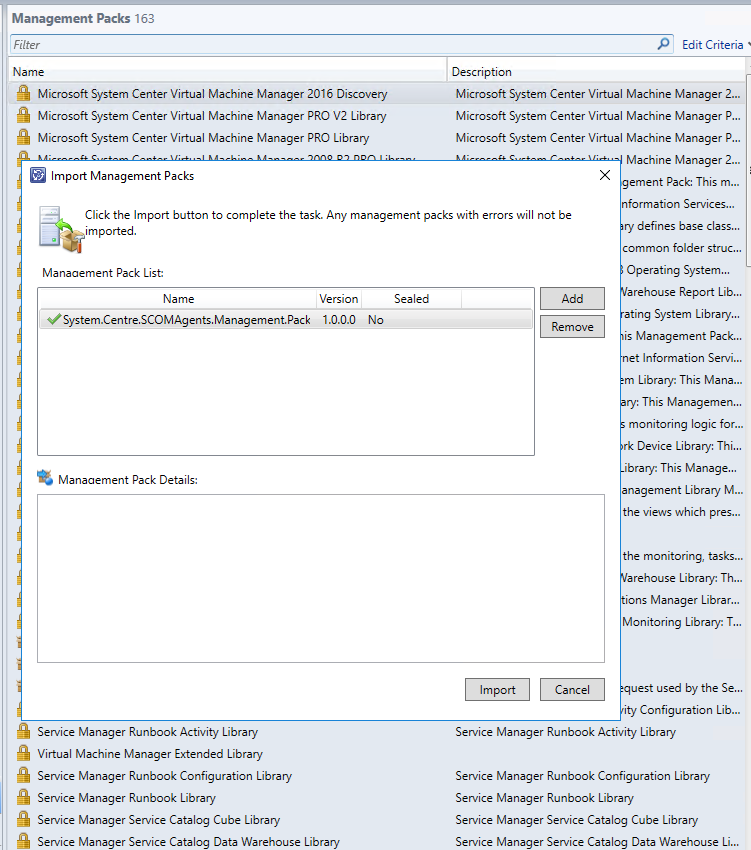
- On the Administration page right click the Management Packs section and then select import.
- Browse to the Management Pack you had just created and click OK.
- Once ready click Import and eventually you should see it has successfully imported.
Creating the views in Service Manager
Now we have the management pack created for our CI Mappings, we now need to see this information by creating some views which are specific to the class which we had created for the management pack.
- Open the Service Manager Console
- Select the Configuration Items tab
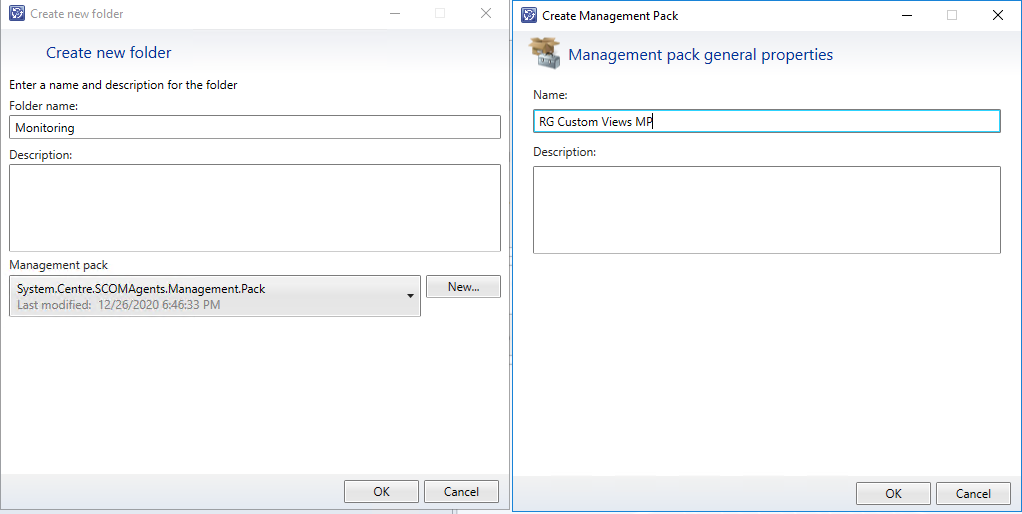
- Right click the root and select Create New Folder and name it something like SCOM . I tend to use folders to group views of classes so that the CMDB has more of an easy organisation in its structure. Before clicking OK, click the New button so that you can create a New Management Pack which you can store its views. Then click OK.
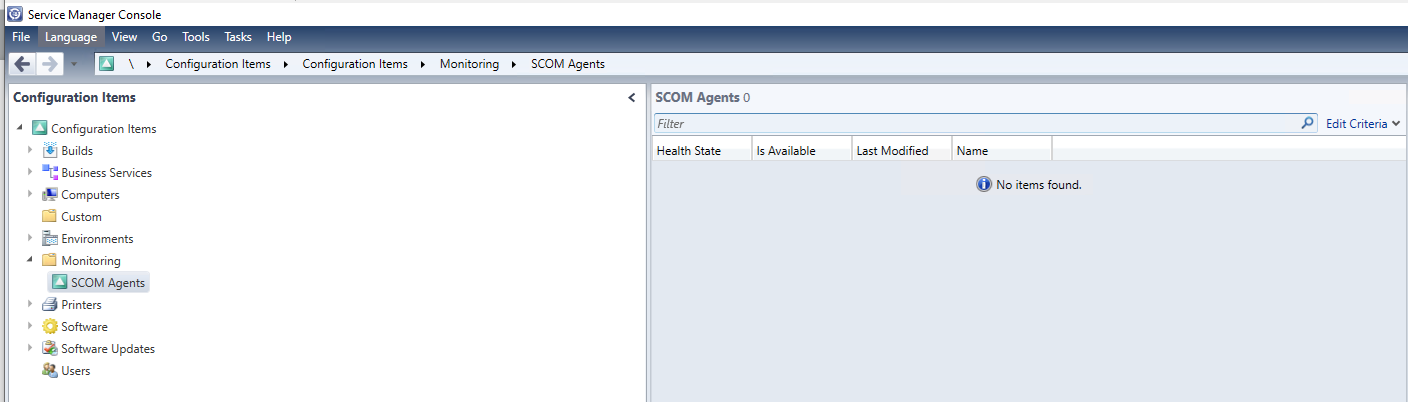
- Right click the folder and select Create View.
- Type in a name for the view such as SCOM Agents
- In the criteria section select browse, then change the tab from Frequently used basic classes to All basic classes and then search for the class which you had just created and select OK.
- In the Display section choose all of the properties you had created in the Management Pack then click OK.
Now you have a view created for your SCOM agents Management Pack. So now whenever your connector does run this view will be populated. So next will be to build the actual connector.
Creating the connector via SC Orchestrator
Now with the management pack created and imported into Service Manager, we now have CI attribute mappings ready to go. So now we then move onto the development of the actual connector itself via System Centre Orcrhestrator which we will not only look at step by step but also look into the mechanism of how we make a successful connection to the database.
The main prerequisites for this would be the following
· Microsoft System Center Orchestrator
· Microsoft System Center Service Manager Integration Pack
· SQL Management Studios + Client SDK + Command Line Tools
The first two are what you will need to formulate the connector logic and the SQL management studios is needed for us to write the PowerShell logic to open a connection to the SCOM Database Server.
So here are the pieces in which you need to create the runbook. First you will need to do the following;
1. Open the runbook designer
2. Right click the Runbooks folder and create a new runbook
3. Make sure the runbook is checked out so you can edit it
4. Use the following boxes below to create the activity steps
| Step Number | 1 |
|---|---|
| Step Name | Schedule Daily at (Specify Time) |
| Integration Pack | System |
| Activity Name | Run .NET Script |
| Functionality | This step will be the initial start point triggered by a specific amount of time. Similar to the connectors within the SCSM console |
| How to Create | Open the scheduling tab in the Runbook Designer application. Drag to the empty space and right click it to show properties. In the details section edit what time interval you want the runbook to run at. |
So Step 1 is the actual initiator of the runbook which will run at a schedule very similar to how the default connectors would work. The time at which you specify to be started is at your discretion. For this example I will kick this off at 9am which is roughly the time similar to the default SCOM CI Connector within Service Manager.
| Step Number | 2 |
|---|---|
| Step Name | Get SCOM Agents |
| Integration Pack | System |
| Activity Name | Run .NET Script |
| Functionality | This step will grab all of the SCOM Agents which are monitored. |
| How to Create | Open the system tab and drag the Run .NET Script step into the runbook creating a link between the first step and this step. Below contains furhter information including the script required for this step. |
Step 2 is where the actual data point connections come into play as we will be using a PowerShell script which will be doing the interrogation on the Database Data point level.
You will need to enter values for the following variables
· $Servername
· $Databasename
· $Query – Where the MonitoringClassID part is as it could be different in your environment
· $User
· $Pwd
These can be placed in the variables section.
Below is the PowerShell script which is used to make a connection to SQL. In this case it has been modified to contact the SCOM Database as seen below. Enter this script into the Run .NET Script box and select PowerShell as its source.
$servername = “<Database Server Name>”
$Databasename = “<Database Name>”
$Query = "Use OperationsManager select distinct * from dbo.ManagedEntityGenericView Where FullName LIKE '%HealthServiceWatcher%' AND MonitoringClassId = 'A4899740-EF2F-1541-6C1D-51D34B739492'"
$user
= "<Domain\Username>”
$pwd = "<Password>"
$QueryTimeout = 120
$Connectiontimeout = 30
$Connection = New-Object System.Data.SqlClient.SqlConnection
$Connectionstring = "Server=$servername;uid=$user;pwd=$pwd;Database=$database;Integrated Security=True"
$connection.ConnectionString = $Connectionstring
$connection.open()
$command = $connection.CreateCommand()
$Command.CommandText = $Query
$result = $command.ExecuteReader()
$Agents = New-Object "System.Data.DataTable"
$Agents.Load($result)
$Name = $Agents | ForEach-Object {$_.DisplayName}
$HealthState = $Agents | ForEach-Object {$_.HealthState}
$IsAvailable = $Agents | ForEach-Object {$_.IsAvailable}
$AvailabilityLastModified = $Agents | ForEach-Object {$_.AvailabilityLastModified}
$BaseManagedEntityId = $Agents | ForEach-Object {$_.BaseManagedEntityId}
Once created then go into the published data option and create the variables which you see in the script which are
·Name
·HealthState
·IsAvailable
·AvailabilityLastModified
This will allow you to pass the variable data across to the other activities.
| Step Number | 3 |
|---|---|
| Step Name | Find SCOM CI Agent |
| Integration Pack | SC 2016 Service Manager |
| Activity Name | Get Object |
| Functionality | This will check to see any of the SCOM agents actually exist within the Service Manager Database |
| How to Create | Drag the Get Object activity from the SC 2016 Service Manager integration pack and into the runbook creating a link between “Get SCOM Agents” and this activity. Open the activity and make sure to select the class for which you created within the management pack for the SCOM agents. And add a filter for the displayname to use the “Name” published data from the “Get SCOM Agents” step |
Step 3 is where all of the checking of each CI happens. Once all of the CIs have been discovered from the second step, it will then check it against the Service Manager CMDB to see if this record exists or not. Below steps contain which will be applicable if it exists or doesn't exist.
| Step Number | 4 |
|---|---|
| Step Name | Add SCOM CI Agent |
| Integration Pack | SC 2016 Service Manager |
| Activity Name | Create Object |
| Link Conditiion | Name from Find SCOM CI Agent matches pattern ^$ |
| Integration Pack | SC 2016 Service Manager |
| Functionality | Creates the SCOM CI within Service Manager |
| How to Create | Drag the Create Object activity from the SC 2016 Service Manager integration pack and into the runbook creating a link between “Find SCOM CI agent” and this activity. Edit the link properties between them both and make sure to set it as “Display Name from Find SCOM Agent CI matches pattern ^$” which means if this property is blank. Again edit the properties of the activity and select the custom class you created and add the following fields • Name • Is Available • Availability Last Modified • Health State And then right click each one and map the published data from the “Get SCOM Agents” to the appropriate fields |
Step 4 is used to deal with CI s which have not been found in the CMDB as already existing. So this step will then create the CI with all of the attributes which we had designed to be placed into the CMDB.
Note:
The link condition mentioned above using ^$ is a null pattern
| Step Number | 5 |
|---|---|
| Step Name | Update SCOM Agent |
| Integration Pack | SC 2016 Service Manager |
| Activity Name | Update Object |
| Link Conditiion | Name from Find SCOM CI Agent does not match pattern ^$ |
| Functionality | If the SCOM CI already exists in Service Manager then it will update the property with the new information from SCOM |
| How to Create | Drag the Update Object activity from the SC 2016 Service Manager integration pack and into the runbook creating a link between “Find SCOM CI agent” and this activity. Edit the link properties between them both and make sure to set it as “Display Name from Find SCOM Agent CI doesn’t match pattern ^$” which means if this property is blank. Again, edit the properties of the activity and select the custom class you created and add the following fields • Name • Is Available • Availability Last Modified • Health State And then right click each one and map the published data from the “Get SCOM Agents” to the appropriate fields |
Step 5 deals with CIs in the category of them already existing within the CMDB. So this step will then detect which attributes are different from which has already been discovered and will update them appropriately thus keeping data integrity at a solid point.
Note:
The link condition mentioned above using ^$ is a null pattern
So your Orchestrator runbook should look something like this.
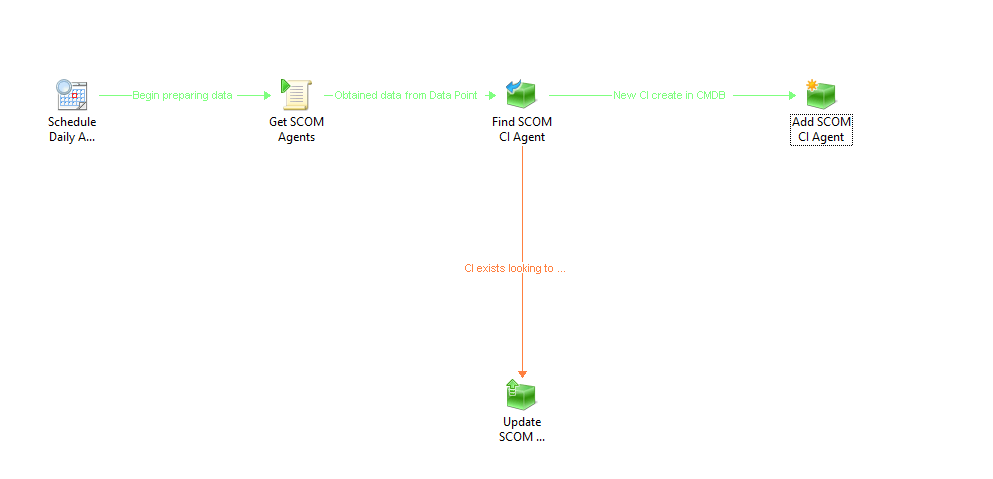
Once the runbook has been saved and checked in you are now ready to run.
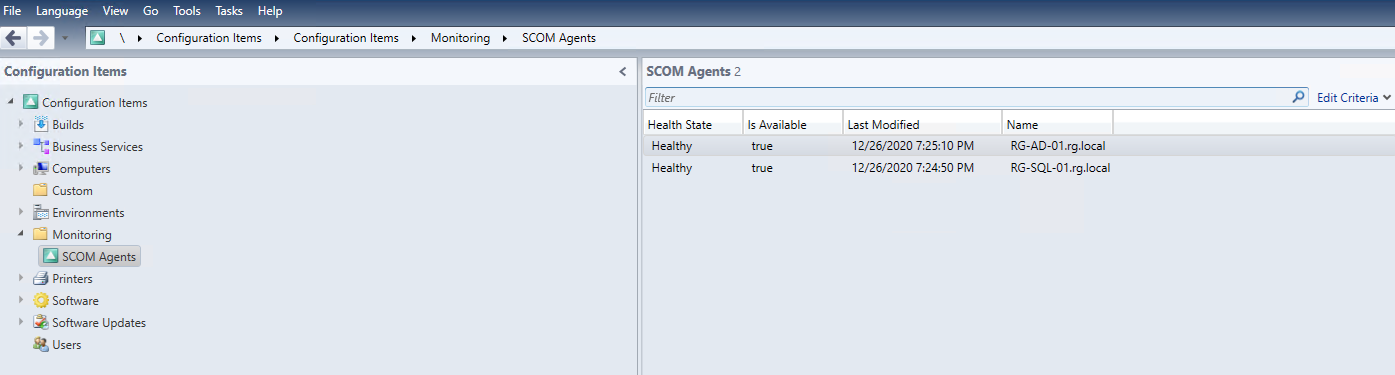
When successfully ran, if we go back into the Service Manager Console we should now start to see CI's populated like below.
Overview of series
We have now investigated the whole spectrum of how we can not only have a fully automated CMDB from end to end with all of our toolsets, but also how to harden and standardise the toolsets to where full data integrity is maintained throughout the whole process.
When carried out correctly achieving a 99% success rate is not out of reach, course success rate and the data which is being corrected depends on the up keep on the overall toolsets from the backbone of data points to the GUIs which connect into them.