SCCM: Windows 10 Feature Update showing as Compliant when not installed
Issue
When trying to deploy a Windows 10 Feature Update through SCCM onto an SCCM managed machine, you may find an issue which even though the designated machine is on a lower build number than the feature update it still shows as being compliant.
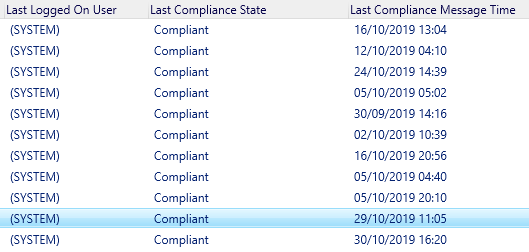
This does takes some analysis to figure out this issue. But if you right click any of the machines listed in the table you would normally expect to see the following once clicked “More Details”
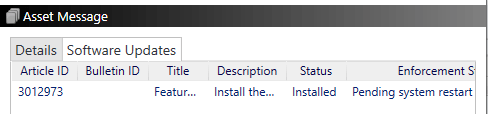
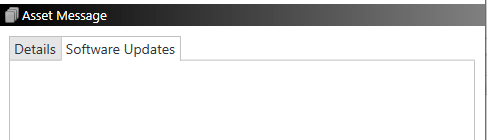
But on machines which are showing a compliant message and an error code of 0x000000 for success, you will see it will show blank.
So when you investigate a machine in question you see there are no folders such as the C:\$Windows~BT which is normally created when you are installing the update, and also no trace of the update being downloaded when you look at C:\Windows\SoftwareDistribution\Download
Software Centre also shows nothing alongside all of the logs within C:\Windows\CCM\Logs such as;
·UpdatesDeployment.log
·UpdatesHandler.Log
·UpdatesStore.Log
And nothing within the C:\Windows\CCMCache folder.
In some cases you may notice that the machine has not downloaded any kind of Windows Updates or perhaps stuck on “Downloading 0%” in this case we will need to analyse the Windows Update agent and see what we get. After running a scan we are given the following error
Reason
Depending on the setup of your environment it can be down to delays within the status messages where the machine cannot get a timely response from the SUP server to actually check if the update is detected on the machine or not.
Another way to verify this is to create a Configuration Baseline with the Windows 10 Feature Update attached to it and deploy to a collection of machines that you can check this against.
If this shows as “Compliant” and the Windows 10 build is below the feature update you are rolling out then you most likely have this issue.
Workarounds
Upgrade SCCM Client to latest version
If you are a few versions down from your current SCCM version you will need to make sure that the designated machines do have the latest client version. If you are unable to set the auto upgrade option you can create a package by the client definition and deploy to a collection of machines.
1.Go to Packages
2.Right click and choose “Create Package from Definition”
3. Package Definition: Specify information about the package definition file to import – Select the Microsoft publisher and choose the Configuration Manager Client Upgrade latest version entry you see there.
4. Source Files: Specify information about the package source files – Select Always obtain source files from a source folder. Click next.
5. Source Folder: Specify the package source folder – Browse to the location of the client package which should be on your SCCM server installation path, then select the client folder.
6. Summary : Confirm the settings – Click next to finish.
Once you have created the package distribute the package to your DPs. Then deploy the package to the collection you have with the machines getting the feature updates to make sure they have the latest client version.
Then run the following actions;
·Machine Policy Retrieval & Evaluation Cycle
·Software Updates Deployment Evaluation Cycle
·Software Updates Scan Cycle
Send Status Message from client machine
With the delay of status messages we may want to send one from
the client machine to manually trigger an update/response to check the
compliance of the update.
( Note:
Below commands referenced from reddit post https://www.reddit.com/r/SCCM/comments/80d4du/feature_update_to_windows_10_1709_compliant/)
$SCCMUpdatesStore = New-Object -ComObject Microsoft.CCM.UpdatesStore
$SCCMUpdatesStore.RefreshServerComplianceState()
New-EventLog -LogName Application -Source
SyncStateScript -ErrorAction SilentlyContinue
Write-EventLog -LogName Application -Source SyncStateScript -EventId 555
-EntryType Information -Message "Sync state ran successfully."
Once ran you can go to the Event viewer to check if the
status message had been sent successfully. Once confirmed you can run the
following actions;
·Machine Policy Retrieval & Evaluation Cycle
·Software Updates Deployment Evaluation Cycle
·Software Updates Scan Cycle
Alternative Feature Update Deployment
You can deploy the Windows 10 feature update differently if you are still experiencing issues in this method, which involves creating the Windows 10 feature update into a package with a program.
When the feature update is downloaded you will normally see two files
·ESD File
·WindowsUpdateBox.exe

These can be found in the following locations;
· C:\Windows\SoftwareDistribution\Download
· C:\Windows\CCMcache
· Folder which you designated to be the Software Update Package where the feature update would be downloaded to
Create Package from Windows 10 Feature Update
Once you have these files copy them to your SCCM source folders where you will create a package from. In order to install it you will need to configure a .CMD file i.e. Install.CMD.
There are three commands which are used in order to install the feature update which will explain in further detail;
· Start /W WindowsUpdateBox /Update /PreDownload – This command does the checking and preparing of your machine before the actual update is applied and also downloads the necessary files it needs.
· Start /W WindowsUpdateBox /Update /Install – This command kicks off the actual installation and this is where you start to see the C:\$Windows~BT folder.
· Start /W WindowsUpdateBox /Update /Finalize – This command prepares the machine after the installation and then performs an automatic restart. ( Note: You can stick with the first two if you don’t want to prompt for a restart right after or configure a step to show a warning before hand)
Add the commands to the Install.CMD file then place into the folder which will be used as the package.
1.Go to Packages
2.Right click and select Create New Package
3. Package: Specify Information about this package – Provide name and details and source folder where you have the feature update files. Click next.
4. Program Type: Choose the program type that you want to create – Select Standard Program. Click next.
5. Standard
Program:
Specify information about
this standard program
Name:
Install Windows 10 Feature Update (Build Number)
Command Line:
Install.cmd
Program Can Run:
Whether or not a
user is logged on
6. Requirements: Specify the requirements for this standard program – Click next.
7. Summary: Confirm the settings – Click next to create the package.
Distribute the package and then push the program to the machines you want to upgrade.