
SCCM: Windows 10 Feature Update Rollouts via Application Package
Update your Windows 10 estate with an Application method!
For those who are performing the Windows 10 feature update rollouts using SCCM software updates you may experience a multitude of issues such as;
- Feature Update showing as compliant - Normally resolved from having the latest version of the SCCM client installed on a client machine, though there have been reports where this issue still persists after the latest version has been installed
- Timeout issues after 60 minutes - Normally resolved from increasing the timeout value from the default 60 minutes to 180 minutes for example., but sometimes the timeout can still happen even after setting this when analysing the SetupAct.log and SetupError.logs in the C:\$Windows~BT\Sources\Panther location
- GPOs for Windows Update SfB Grace Period ends - After approximately a year the latest feature update is then installed on machines which can be resolved from removing the dual scan which scans for Windows Updates from the internet as well as your WSUS/SUP.
Benefits of Deploying a Feature Update via Application
The benefits of doing it this way are the following;
- No issues of having the update show as compliant and not deploying
- No timeout restriction during the actual installation
- Better control of the deployment without need of using the Windows Sfb GPOs
- Control on whether devices will have a forced restart or a user controlled restart
Building the Feature Update Application
Where to get the files
You can get them from two ways;
- Download the Software update from the SCCM console and select a location to download it to
- Download from Windows update which will end up in the C:\Windows\SoftwareDistribution\Download\
- *.ESD File
- WindowsUpdateBox.exe
Once we have the files downloaded they will be needed to be placed into a folder within your content share which you would normally keep all of your applications when distributing them to your DPs.
Installation Command for the Feature Update
Install commands will follow as below along with an explanation to the commands and what more can be done with them.
Create file called "Install.cmd" and then enter the the following commands below
start /w WindowsUpdateBox /Update /PreDownload /quiet
start /w WindowsUpdateBox /Update /Install /quiet
start /w WindowsUpdateBox /Update /Finalize /quiet
The commands above take care of the intial preparation for the Windows 10 Feature update, as well as the install and the finalize step is where the machine would reboot.
If you require the update to not perform a reboot then you can add a /noreboot
switch to each line.
( Note:
Read the section of the deployment of the application to know how to handle the process once this switch has been added)
Steps on how to create the application
- Open the Configuration Manager Console
- Go to the Software Library
- Right click Applications and choose Create Application
- General: Specify settings for this application -
Click to "Manually specify the application information" then click next.
- General Information: Specify information about this application -
Enter a name such as "Windows 10 Feature Update" and along with the feature update number you are looking to rollout then click next.
- Software Center: Specify the Software Center entry -
Click next
- Deployment Types: Configure deployment types and the priority in which they will be applied for this application -
Click Add.
- Create Deployment Type Wizard: General: Specify Settings for this deployment type -
Click to "Manually specify the deployment type information" then click next.
- General Information: Specify general information for this deployment type -
Provide a name for the deployment type then click next.
- Content: Specify information about the content to be delivered to target devices -
Browsee to the location where you have downloaded the software update and type in Install.cmd
for the installation program. Then click next.
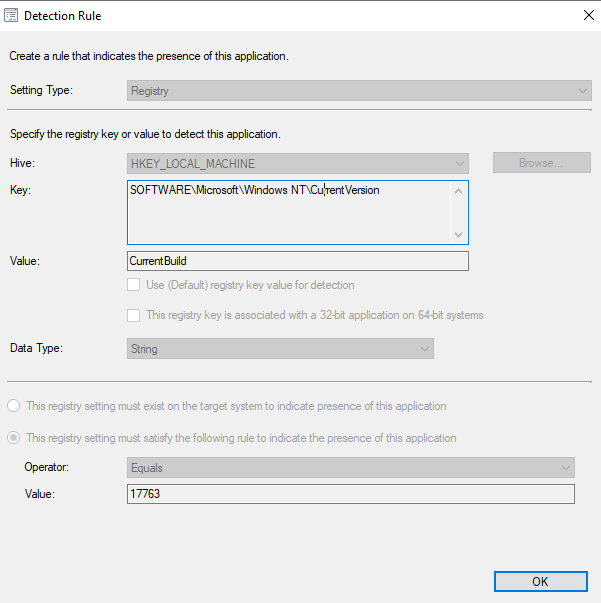
- Detection Method: Specify how this deployment type is detected - Click Add Clause
- Detection Rule -
Configure the registry settings as below. This would be the location to get the build number ( Note:
this is for 1809)
13. User Experience: Specify user experience settings for the application -
Installation Behavior: Install for System
Logon Requirement: Whether a user is logged on or not
Installation Program Visibility: Normal
Click next
14. Requirements: Specify installation requirments for this deployment type -
Click next
15. Dependencies: Specify software dependencies for this deployment type -
Click next.
16. Summary: Confirm the settings for this deployment type -
Click next.
17. Summary: Confirm the settings for this Application -
Click next.
Deploy the Windows 10 Feature Update
Now you should be ready to deploy the application to machines within a collection to perform the Windows 10 feature update.
You can also create a Task Sequence with the application so that you can initiate a restart notification, as the default of this deployment method would restart as soon as the finalize command line takes place.